www.gadjev.com
https://www.gadjev.com
IT does matterSat, 14 Dec 2024 23:56:08 +0000en-US
hourly
1 https://wordpress.org/?v=6.6.2Synology not booting correctly after DSM 7.2.2 Update
https://www.gadjev.com/2024/12/15/synology-not-booting-correctly-after-dsm-7-2-2-update/
Sat, 14 Dec 2024 23:56:07 +0000https://www.gadjev.com/?p=243In this post, I’ll share the key lessons learned from a lengthy troubleshooting session after upgrading from DSM 7.1.1 to DSM 7.2.2.
The Symptoms:
The DSM upgrade from version 7.1.1 to 7.2.2 appeared successful.
After the upgrade, DSM booted fine, allowing login and access to SMB shares.
However, after the subsequent reboot, DSM got stuck at the “System is getting ready…” screen at the login prompt.
Multiple reboots didn’t resolve the issue.
SSH was unavailable, but fortunately, the serial connection was still functional, providing the only way in.
Initial Observations: Upon logging in, it became clear that:
No disks were mounted.
/etc/fstab was empty.
cat /proc/mdstat showed all drives and RAID arrays were healthy.
The first step was to investigate what was supposed to populate /etc/fstab and why it wasn’t working. It turns out that the process is controlled by a binary called /usr/syno/bin/synocfgen, with a symlink to /usr/syno/cfgen/s00_synocheckfstab.
Running the binary manually (/usr/syno/cfgen/s00_synocheckfstab), followed by mount -a, successfully mounted all the volumes.
The Next Step: The question then shifted to determining what was responsible for executing /usr/syno/cfgen/s00_synocheckfstab. After some digging, I found the culprit:
A script called volume.sh located in /usr/syno/lib/systemd/scripts/volume.sh.
This script is associated with the syno-volume.service, defined in /usr/lib/systemd/system/syno-volume.service.
ash-4.4# cat /usr/lib/systemd/system/syno-volume.service; [Unit] Description=Synology volume service Wants=syno-space.target After=syno-space.target
The Problem: The syno-volume.service wasn’t running! Running systemctl status syno-volume.service confirmed this.
Going next – Why syno-volume service wasn’t running. It took quite some time to go through various logs for messages/errors – all without result. Went through observing the dependencies of syno-volume service:
all dependent services were there and running (syno-spaces and some others…)
and somehow expected – none of the services that depend on syno-volume were started (systemctl list-dependencies –reverse syno-volume)
Starting manually the systemd services (returned by the reverse list-dependencies command) brought a fully functional NAS…Until the next reboot…when it stuck at login prompt again.
After some other round of thinking I decided to check what is the default target systemd level. And it turned out it is not the default one of Synology!
On the broken system:
systemctl get-default
pkg-synobrm-keep-session.target
On a healthy system:
systemctl get-default syno-bootup-done.target
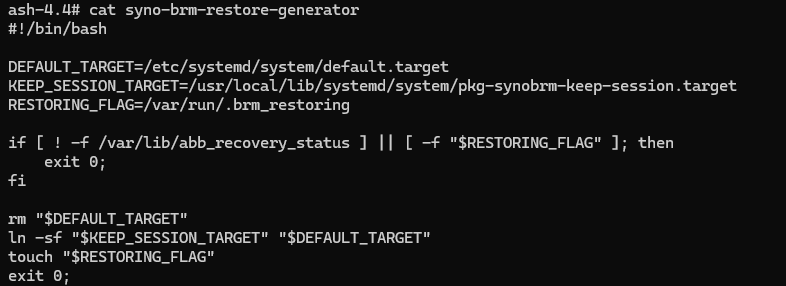
Final piece of the puzzle was to identify why the default systemd level was changed (and of course, manualy changing it was lost on next reboot, so another round of reverse engineering the synology scripts&configs was necessary). Grepping here and there led this time to /usr/syno/lib/systemd/generators/syno-brm-restore-generator – updated very recently and likely coming from the latest DSM.
Upon examining the syno-brm-restore-generator, it became evident that two files could trigger the logic that changes the default systemd target:
/var/run/.brm_restoring
/var/lib/abb_recovery_status
These files appear to play a role in altering the system’s default target, which was disrupting the boot process.
When comparing with a healthy system that had also gone through the same upgrade to DSM 7.2.2, it was found that the files /var/lib/abb_recovery_status and /var/run/.brm_restoring were absent. Removing these files allowed systemd to restore its default target, and the NAS became fully functional again.
However, the reason why these files were present in the first place, despite the system having been upgraded correctly, remains a mystery.
]]>AWS CodeBuild fails when changing to a folder directory with a space
https://www.gadjev.com/2021/10/15/aws-codebuild-fails-when-changing-to-a-folder-directory-with-a-space/
Fri, 15 Oct 2021 18:08:23 +0000http://www.gadjev.com/?p=236I write my articles when some technical issue really frustrates me and when there’s not much information available about it on the Internet.
There’s an issue a hit recently in AWS CodeBuild – when you cd into a directory with a space in it’s name, CodeBuild breaks on the very next command and “resets” your current directory. If you next commands depends on your current directory this could lead to Build Failures.
Error hit: “/codebuild/output/tmp/script.sh: 1: cd: can’t cd to XXXXXX“
Reason behind seems a wrapper script(/codebuild/output/tmp/script.sh) used by AWS CodeBuild to keep hold of the directory you’re currently in. It stores in a temporary txt file the directory path and on the next command it tries to read the directory from the temp file and cd into it. Problem comes when there’s a space in the directory name which make the wrapper script interprets the content of the temp file as 2 strings rather than 1.
This is how the wrapper script “collects” the current directory: pwd > /codebuild/output/tmp/dir.txt
And that’s how it tries to “load it back” cd $(cat /codebuild/output/tmp/dir.txt) (in bash this will throw “-bash: cd: too many arguments”, in sh – “sh: 1: cd: can’t cd to” when dir.txt contains a space”
Here’s a sample buildspec to reproduce the issue.
version: 0.2
phases:
  build:
    commands:
      - pwd && echo "codebuild starts initially in this directory"
      - cat /codebuild/output/tmp/script.sh
      - cd /tmp
      - pwd && echo "obviously we are in tmp now"
      - mkdir /tmp/folder\ with\ space
      - touch /tmp/folder\ with\ space\somefile.txt
      - cd /tmp/folder\ with\ space
      - ls -lah && echo "expecting this to list somefile.txt"
      - pwd && echo "codebuild has reset the current directory"
]]>Veeam backup failures after adding ESXi host to vCenter
https://www.gadjev.com/2021/10/15/veeam-backup-failures-after-adding-esxi-host-to-vcenter/
Fri, 15 Oct 2021 17:54:37 +0000http://www.gadjev.com/?p=231Veeam have a KB article(https://www.veeam.com/kb1857) with ideas how to troubleshoot the following backup failure error:
Unable to allocate processing resources. Error: No backup proxy is able to process this VM due to proxy processing mode restrictions.
There could be scenarios not listed in the KB, like the following quite specific one.
Imaging you have the following:
Veeam Backup & Replication Server;
an ESXi Host (ESXi 6.7 in this case);
a Linux backup proxy and repository – single Linux VM on the ESXi Host;
couple of VMs from same host being backed up with Veeam B&R using the proxy (operating in Virtual appliance transport mode).
Imagine you then add the ESXi Host to vCenter and your backups start failing. It doesn’t matter if you disconnect/remove the host from vCenter – backups keep failing. (you don’t change anything in the Veeam configuration and still have your ESXi host directly added, not as a vCenter server)
When digging into the problem C:\ProgramData\Veeam\Backup\<jobname>\Job.<jobname>.Backup.log says:
Error Failed to connect to agent’s endpoint ‘<Backup Proxy IP>:2500’. Host: ‘<Backup Proxy IP>’. Error No connection could be made because the target machine actively refused it <Backup Proxy IP>:2500 (System.Net.Sockets.SocketException)
Then looking at Backup Proxy logs at /var/log/VeeamBackup/<jobname>/Agent.LinuxFileCommander.log it reports quite a generic error:
ERR |Server session thread has failed.
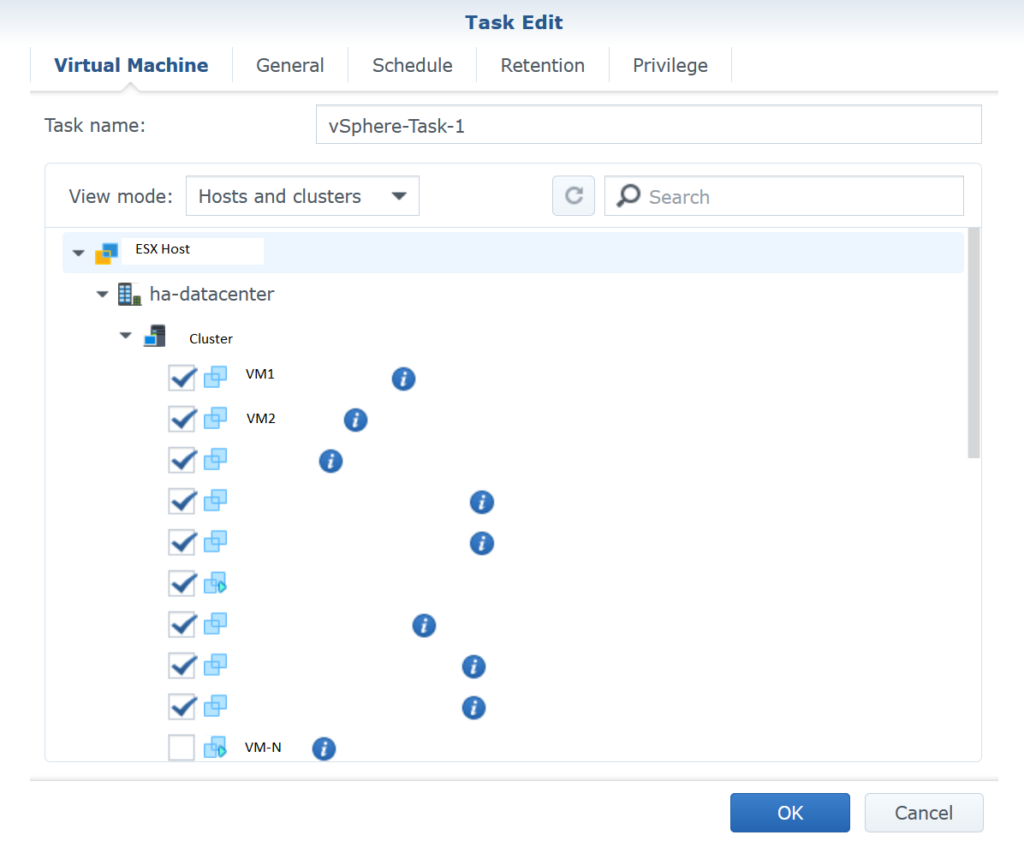
The problem is that Veeam cannot identity it’s Backup Proxy VM on the ESXi host, since the VM is moved somewhere else within the “Hosts & Clusters tree” in Vmware. Reason of this is the addition of the ESXi Host to vCenter which creates a “tree” hierarchy for the <datacenter> <cluster> <VMs> and this configuration remains on the ESXi host even when disconnected from vCenter. However this hierarchy is not visible in the Veeam B&R VMware inventory! Other Backups solutions, like the Synology’s Active Backup for Business however correctly displays the tree structure of the ESXi host (Note the ha-datacenter and the cluster below. Real names are masked obviously.)
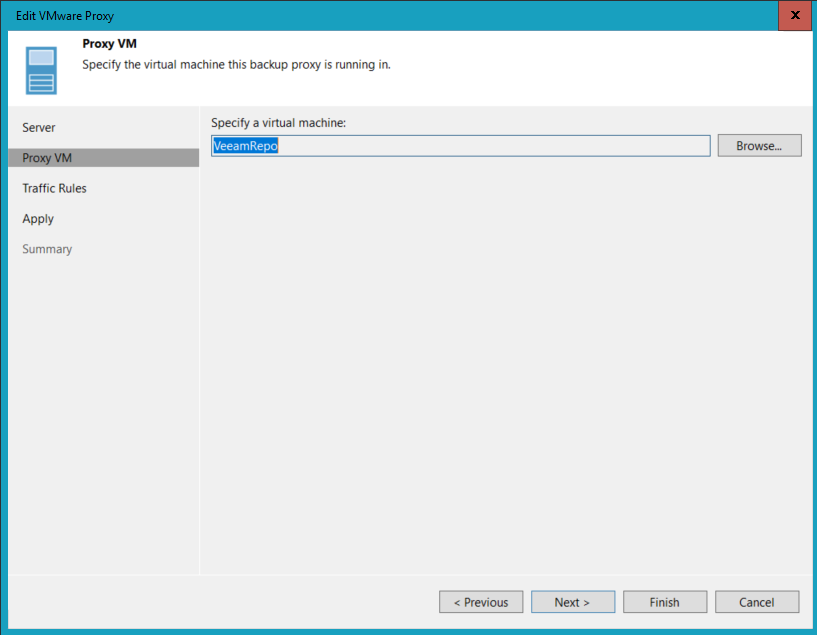
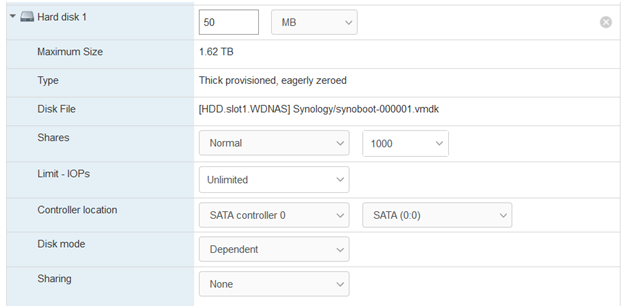
So, how to fix the issue? Probably during your troubleshooting attempts you’ve went through the properties of the Backup Proxy to verify your current configuration and you’ve seen this screen.
Most people would conclude that the selected VM is correct. However it isn’t – since it’s located at a different place with VMware’s “Host&Clusters” tree structure.
To fix this you have to browse and select the very same VM, saving the configuration. This makes Veeam update it’s config to point correctly to the Backup Proxy VM.
]]>Xpenology – Overcoming VMware Challenges with DSM 6.1.7 to 6.2.2 Upgrade
https://www.gadjev.com/2020/05/03/xpenology-overcoming-vmware-challenges-with-dsm-6-1-7-to-6-2-2-upgrade/
Sun, 03 May 2020 13:13:03 +0000http://www.gadjev.com/?p=218I usually write articles when something frustrates me – in this case the behavior of VMware ESX SATA Controller ordering, which led to a couple of failing Synology DSM 6.1.7 to 6.2.X( X>0) which require SATA, instead of SCSI Controller (which used to be working up to DSM 6.2.0 in my case, and most probably in yours also).
Consider the following scenario:
DSM 6.1.7 – up and running
VMXNET3 Network Adapter
Jun’s loader 1.02b DS3615xs – attached as SATA (0:0) (SATA Controller 0, Target 0)
VMware Paravirtual Storage Controller – for data disks, attached as SCSI (0:X) (SCSI Controller 0)
We want an Upgrade to DSM 6.2.2 which involves several steps (not going into details here – you can google them):
I somehow prefer going through 6.2.0 first (DSM_DS3615xs_23739.pat) since it’s the last DSM working with SCSI Controller
Use the newer Jun’s loader 1.03b https://xpenology.club/downloads/ – Replace synoboot.img in your datastore
Replace the VMXNET3 Network Adapter with E1000E. Take care if you’ve used static MAC Addresses!
Run a manual update using DSM_DS3615xs_23739.pat
Checkpoint 1: If everything is fine your Synology VM shall boot the new DSM 6.2 and work with your existing SCSI Controller!
Change the SCSI to SATA Controller – It’s usually relatively straightforward:
Add the new “SATA Controller 1” (remember synoboot is at SATA Controller 0)
Re-attach the disks from the SCSI Controller to SATA Controller 1. Use same disk orderering if you’d like – SCSI (0:0)–>SATA (1:0) ; SCSI (0:1) –>SATA (1:1), etc..
Remove the SCSI Controller
CheckPoint 2: Check if DSM 6.2 boots – here comes the interesting part – sometimes Synology boots in “recovery/installation” mode. In my case I got 1 successful replacement in ESX 6.0 and 2 failures – with ESX6.0 and ESX6.7U3 (so not an ESX version specific issue)
TLDR – VMware sometimes mix the SATA Controllers order!
The expected behavior is SATA Controller 0 to be first (and our boot drive goes there) and SATA Controller 1 to be second. VMware replaced the order however! Why – haven’t dig into the details of the VMware order, but I wanted to understand why it messes up DSM.
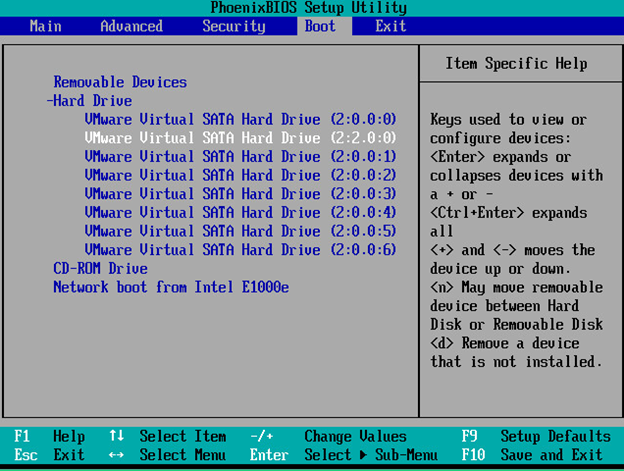
First of all, how to recognize easily that ordering is messed up:
Look at VM BIOS – Our boot disk is attached at SATA (0:0), however in BIOS it is at host 2 – 2:2.0:0. Look at the 7 additional data disks attached to host 1 (2:0.0.X), despite in VMware they are attached to SATA Controller 1 (SATA 1:X)
Go to the synology manual install step – don’t install, but take a look at the warning synology raises about overwriting your data. If you see only a single disk (in my case it was disk “2“) – then it’s messed up since you are seeing the boot disk.
Then what’s the impact of this controller order – well it seems its in the specifics of the synology boot loader, which expects:
Only 1 disk on the first controller for boot disk (it hides the remaining using sata_args – SataPortMap=1)
set sata_args=’sata_uid=1 sata_pcislot=5 synoboot_satadom=1 DiskIdxMap=0C SataPortMap=1 SasIdxMap=0′
Take a look at https://gugucomputing.wordpress.com/2018/11/11/experiment-on-sata_args-in-grub-cfg/ for a good explanation of sata_args
Thesolution – well – simply re-attach the disks to the other controller. For example the boot disk SATA (0:0) becomes SATA (1:0), DATA disks SATA (1:X) becomes SATA(0:X)
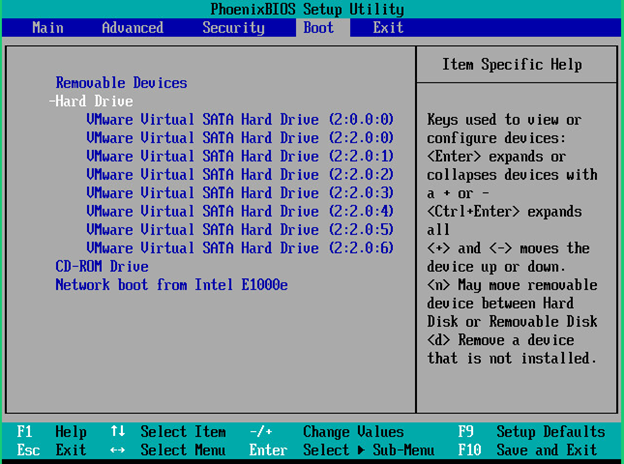
Here’s how they look like in BIOS after controller swap (Note the boot disk is at 2:0.0:0):
Checkpoint 3: DSM 6.2 now boots using correctly ordered SATA Controllers
Finally you can install DSM 6.2.2 (DSM_DS3615xs_24922.pat), which installed successfully in my 3 environments after I got the right VMware VM “hardware” configured
Checkpoint 4: DSM 6.2.2 boots successfully
Few side notes:
in 2 of my upgrades, DSM lost its static IP and had to be reconfigured (use find.synology.com in such case)
in 2 of my upgrades, DSM system partition got “corrupted” and the underlying /dev/md0 array had to be rebuilt.
]]>iSCSI Initiator problem -Initiator Instance Does Not Exist.
https://www.gadjev.com/2019/02/14/iscsi-initiator-problem-initiator-instance-does-not-exist/
Thu, 14 Feb 2019 19:02:59 +0000http://www.gadjev.com/?p=210Recently changed IP subnet range in the local network and turned out one of the Windows servers was not able to connect its iSCSI disks from the Synology NAS. When trying to rediscover from the iSCSI Initiator there following error was present:
Initiator Instance Does Not Exist.
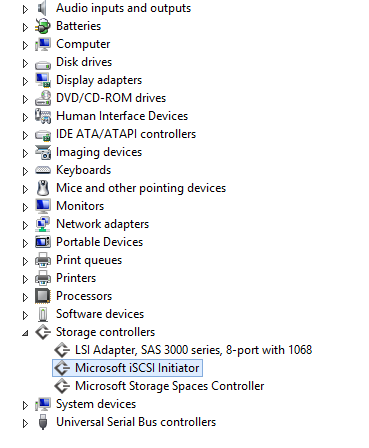
Resolution was to uninstall the Microsoft iSCSI Initiator storage controller from device manage and install it again.
Steps:
Right Click Microsoft iSCSI Initiator and click Uninstall.
Right click the computer name and click Add legacy hardware.
Click Next.
Select “Install the hardware that I manually select from the list (Advanced). Click Next.
Select Storage Controllers from the hardware types list.
Select Microsoft as Manufacturer and Microsoft iSCSI Initiator as Model.
Click Next twice. and wait the device to install.
Use the iSCSI Initiator to connect to your iSCSI Target.
]]>Failing HealthChecks on Regional Google Cloud TCP Load Balancer
https://www.gadjev.com/2018/01/06/failing-healthchecks-on-regional-google-cloud-tcp-load-balancer/
Sat, 06 Jan 2018 13:59:16 +0000http://www.gadjev.com/?p=206Often Google are right, but sometimes not.
Recently I was looking at why GCP TCP Load Balancer healthchecks were failing, despite I have configured strictly my local OS firewall to allow the documented health check IP ranges :
(https://cloud.google.com/compute/docs/load-balancing/network/ – Section Firewall rules and Network load balancing – 209.85.152.0/22, 209.85.204.0/22, and 35.191.0.0/16 at the time of writing).
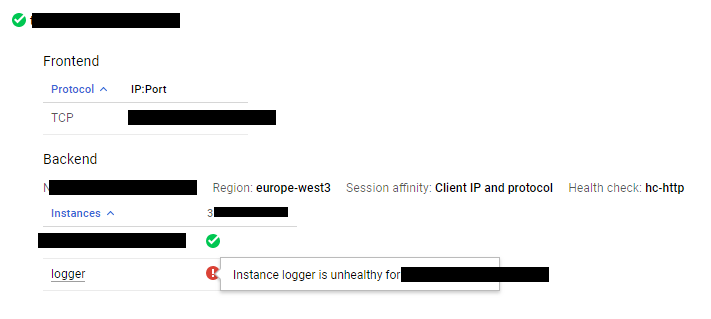
Network Services–>Load Balancing–>Load Balancers tab was stating my instances were unhealthy:
Instance <instance name> is unhealthy for <LBIP>
It turned out Google is sending healthcheck from their metadata IP address instead – metadata.google.internal (169.254.169.254)
Allowing this in the OS firewall made the HCs succeed!
]]>Xpenology on VMware – Disk Extend
https://www.gadjev.com/2017/06/11/xpenology-on-vmware-disk-extend/
Sun, 11 Jun 2017 13:39:40 +0000http://www.gadjev.com/?p=201Recently I run out of free space on one of my XPenology DSM 6 drives and had to run an extend.
Since it’s running on ESXi, the VMware disk extend was easy. However surprisingly or not the Synology part wasn’t. The GUI does not allow you to increase the size of the RAID Group (in my case Basic without protection – single disk RAID1, Storage Manager–>RAID Group–>Manage the “Expand” option is grayed out)
So it was obvious manual resize through SSH is necessary.
After some time spend on googling good articles for doing this, the best one i found was http://blog.azib.net/2013/12/how-i-upgraded-my-synology-nas-to.html. It explains quite well the overall process of manually extend the volume (extend the vmware disk partition, the MD device, the physical, virtual and logical LVM volumes) , however I found Step 1 from the guide as dangerous (the partition recreation with a larger one) so I decided to try the parted partition resize option instead.
Below are the commands used, but first PLEASE BACKUP YOUR DATA without attempting anything:
Extend the Disk in the VMware VM and connect to Synology using SSH (sudo su as needed).
parted – launch the parted partition editor
select /dev/sdX – chose which drive to work with (in my case /dev/sdc)
unit s – work with sectors instead of GBs (otherwise you might get a message saying you get outside of disk boundaries)
print free – two reasons for running this – 1. make sure you work with the correct drive; and 2. that you see the free space provisioned from VMwareModel: VMware Virtual disk (scsi)
Disk /dev/sdc: 6012954214s
Sector size (logical/physical): 512B/512B
Partition Table: gpt
Disk Flags:
Number Start End Size File system Name Flags
34s 2047s 2014s Free Space
1 2048s 4982527s 4980480s ext4 raid
2 4982528s 9176831s 4194304s linux-swap(v1) raid
9176832s 9437183s 260352s Free Space 3 9437184s 5153755935s 5144318752s raid 5153755936s 6012954180s 859198245s Free Space <–the free space is after the last (3rd) partition in the disk
resizepart – run the command to resize the partition
Partition number? 3 <– enter the partition number to edit (replace with 3 with your partition number)
End? [5153755935s]? 6012954180s <–Enter the new last partition sector as seen in the print free command
quit the parted editor
Now it’s time to extend the RAID MD device. To do it first you have to stop any activity on it
lsof | grep volume 3 (if lsof is missing – install it from here http://ipkg.nslu2-linux.org/feeds/optware/syno-i686/cross/stable/) <– check for open files on the volume
In my case only samba was using the drive and it was stopped by /usr/syno/etc.defaults/rc.sysv/S80samba.sh stop .Follow Anton’s guide since it’s more detailed on how to find & stop the service using the drives, especially if you work with the volume where Synology packages are installed – usually volume1.
lsof | grep volume3 <– run it again to ensure nothing remains using the volume.
umount /volume3 <– unmount the volume (the GUI might start reporting it as crashed – ignore this for the moment)
vgchange -a n vg3 <– deactivate the LVM Volume Group. Replace vg3 with your VolumeGroup Name (use vgdisplay -v or vgs commands to identify it)
Stop and Re-assemble the RAID array mdadm -S /dev/md5 <– replace /dev/md5 with your MD device mdadm -A /dev/md5 -U devicesize /dev/sdc3 <–replace /dev/md5 with your MD device and /dev/sdc3 with your disk partition
mdadm –grow /dev/md5 -z max <–extend the size of the MD array
pvresize /dev/md5 <–extend the LVM Physical Volume and you’ll see the free space in the Physical Volumeroot@Synology:/usr/syno/etc# vgs
VG #PV #LV #SN Attr VSize VFree
vg1 1 2 0 wz–n- 895.40g 0
vg2 1 2 0 wz–n- 415.40g 0
vg3 1 2 0 wz–n- 2.80t 409.70g
vgchange -a y vg3 <– Activate the LVM volume group
lvextend -L +409GB /dev/vg3/volume_3 <–extend the VLM Logical Volume to the last full GB
lvextend -L +712MB /dev/vg3/volume_3 <–extend it with the remaining MBs as well(use vgs to see how much exact MBs are outstanding)
root@Synology:/usr/syno/etc# vgs <–run vgs to validate you’ve used all available free space
VG #PV #LV #SN Attr VSize VFree
vg1 1 2 0 wz–n- 895.40g 0
vg2 1 2 0 wz–n- 415.40g 0
vg3 1 2 0 wz–n- 2.80t 0
mount /volume3 <–mount the volume
At this stage I expected the Synology GUI to reflect the actual RAID group and volume size, but it wasn’t the case. After a Reboot (which starts the stopped services as well) the RAID group started showing the correct size after the extension. The Volume was still with the old size, but the GUI was handy (Login in Synology–>Storage Manager –>Volume –>select volume 3 –>expand) and the volume was extended, which ended the procedure.
And REMEMBER”
ALWAYS BACKUP YOUR DATA FIRST!
Enjoy!
]]>Citrix XenServer hangs on detecting hardware during deployment on Hyper-V
https://www.gadjev.com/2017/04/23/citrix-xenserver-hangs-on-detecting-hardware-during-deployment-on-hyper-v/
Sat, 22 Apr 2017 23:37:50 +0000http://www.gadjev.com/?p=135Recently I had to deploy XenServer 6.X on my Hyper-V LAB on Windows Server 2012 R2 to evaluate a monitoring solution with 3rd party MS SCOM management pack.
The deployment was expected to be straightforward based on experience I have from other Linux distributions and VMware ESX. However during boot time XenServer was always hanging on “Detecting Hardware.”.
Most of the articles over Internet says to disable ACPI, despite in XenServer 6.X the native safe mode has already that option turned on as well as others compatibility settings like noirqbalance, noapic, etc.
]]>Installing Magento CE 2.0 on Windows Server 2012 R2 IIS 8.5
https://www.gadjev.com/2016/02/08/installing-magento-ce-2-0-on-windows-server-2012-r2-iis-8-5/
Mon, 08 Feb 2016 18:46:22 +0000http://www.gadjev.com/?p=174Magento (https://magento.com/) is one of the top 3 Open Source ecommerce platforms. Designed to run on Linux & Apache it could be a challenge to get it running on Windows IIS right from the first time since officially Magento is not supported on IIS.
Then create an .user.ini file in the root magento directory and copy the .htaccess php settings content for your PHP version. In our case the content for php 5.6 is:
memory_limit = 768M
max_execution_time = 18000
session.auto_start = Off
zlib.output_compression = On
suhosin.session.cryptua = Off
Create another .user.ini file inside pub directory and take the settings from pub\.htaccess:
memory_limit = 256M
max_execution_time = 18000
session.auto_start = Off
zlib.output_compression = Off
suhosin.session.cryptua = Off
6.Converting Magento Apache based .htaccess into IIS web.config 6.1 URL Rewrite Rules
You can use the URL-rewrite IIS settings to import .htaccess URL rewrite rules (URL Rewrite–>Import Rules–>Browse the file and select Import–>remove the non-convertable settings and click apply.
Alternatively place this in web.config into the magento root directory
Make sure the rule name are unique in the deployment ! Otherwise you might get HTTP Error 500.52 – URL Rewrite Module Error
6.2 Convert the Mime Types
[Update Needed]
6.3 Convert all Remaining Settings
[Update Needed]
7. NTFS permissions
“IIS APPPOOL\ApplicationPoolIdentity” (ex. “IIS APPPOOL\MagentoLive”) need to have : READ&EXECUTE access on the magento directory (C:\Websites\Magento) MODIFY access on magento \app\etc directory (for security purposes this should be removed after the installation is complete MODIFY access on magento \var directory MODIFY access on magento \pub\media directory MODIFY access on magento \pub\static directory MODIFY access on the PHP Temp directory (otherwise it throws an errors like “We’re sorry, an error has occurred while generating this email” on the Storefront or “Could not determine temp directory, please specify a cache_dir manually” in the Admin panel
In case PHP Temp directory is not specified in php.ini then PHP takes the folder in the TEMP Environment variable (C:\Windows\Temp by default).
The Default ACL on C:\Windows\Temp on Windows 2012 R2 is (icacls output)
C:\Windows\Temp CREATOR OWNER:(OI)(CI)(IO)(F)
NT AUTHORITY\SYSTEM:(OI)(CI)(F)
BUILTIN\Administrators:(OI)(CI)(F)
BUILTIN\Users:(CI)(S,WD,AD,X)
BUILTIN\IIS_IUSRS:(OI)(CI)(S,RD)
In case magento is the single website on your IIS server you can directly grant the IIS_IUSERS MODIFY permissions Important Security Notice: for all magento directories where you grant write access make sure you remove scripts execution in IIS (go to each folder–>Handled-Mappings–>Edit Feature Permissions–> uncheck Script)
8. Setup PHP OpCache (don’t miss this step! – it’s a great performance boost)
Edit you global php.ini and insert:
inside [php] section zend_extension=php_opcache.dll (the DLL file must be present in your php extensions directory) inside [opcache] section opcache.enable=1 opcache.enable_cli=1 opcache.memory_consumption=128 opcache.interned_strings_buffer=8 opcache.max_accelerated_files=4000 opcache.use_cwd=1 opcache.revalidate_freq=60 opcache.fast_shutdown=1
9. Setup SSL on you IIS website – a lot of content exist on Internet how to do this. It doesn’t matter if you do this before or after the Magento Installation. It’s important to avoid using self-signed certificate.
10. Magento Installation
There are two ways to do this:
A) using the http://yoursite.com/setup web based wizard
or
B) using command line
cd magentorootdirectory
php magento setup:install –admin-firstname John –admin-lastname Doe –admin-email [email protected] –admin-user admin –admin-password yourpassword –base-url http://yoursite.com –db-host=localhost –db-name DB –db-user DBuser –db-password yourDBpassword –use-rewrites 1 –use-secure-admin 1 –session-save db
When you install from the website the Magento installation may hang on (freeze on) Installing schema.. or Upgrading schema.. usually around 4% or 5%. This happens due to IIS FastCGI “Activity timeout” settings (by default 30 seconds)
Adjust the settings to a higher enough value to allow the setup to finish. ex. 3600 (1h)
Then retry the installation by :
– deleting magentorootdirectory\app\etc\config.php and magentorootdirectory\app\etc\env.php
– dropping the MySQL DB tables
– re-running the setup from http://yoursite.com/setup
Until you retry the installation Magento website will return HTTP error 500 Internal Server Error
The installation might fail to deploy the static content making Storefront and the Admin page looking badly formatted(missing pictures, CSS styles, js, etc). To resolve this run:
]]>Auto DoS feature on HP V1810 switches blocks legitimate network traffic
https://www.gadjev.com/2014/06/23/auto-dos-feature-on-hp-v1810-switches-blocks-legitimate-network-traffic/
Mon, 23 Jun 2014 19:52:55 +0000http://www.gadjev.com/?p=146Luckily the default state of the Auto DoS feature on the HP V1810 switches is disabled. And you should always leave it like this.
It’s one of the worse implemented features ever seen on a managed switch. The idea for additional L2 security layer is good, however the realization is definitely poor. With the basic enabled/disabled states and zero customization available, the features set goes into the recycle bin. In particular it blocks all NetBIOS traffic over the LAN due to the “nice” feature called “Prevent UDP Blat Attack”.
It seems HP engineers are not aware NetBIOS use the same UDP Port 138 or maybe they believe it’s rarely used protocol nowadays.
However what happens when you replace some legacy switches on your network with a new HP V1810 series 48 port 1Gbps switches? What I’ve seen in particular is inability to join PCs in an Active Directory domain using the domain NetBIOS names with the following symptoms:
– Error 0x54b(1355 in decimal) present in %windir%\debug\NetSetup.log during PC join attempts.
– nltest /dsgetdc returns ERROR_NO_SUCH_DOMAIN (the same 1355/0x54b)
– no NetBIOS broadcast resolution
– no NetBIOS traffic reaching destination server with local LMHosts file entries enabled
– and much more.
Clearly reading the full vendor documentation before deploying any new equipment is a must. Otherwise you can spend hours in troubleshooting to understand how a single check box affects your Active Directory environment.
Reference: Auto Dos features description.
Auto DoS
Enable – Select to prevent receiving packets from the all attacks mentioned below (Default: Disabled).
Prevent Land Attack – Prevents receiving packets with matching Source and Destination IP addresses.
Prevent TCP Blat Attack – TCP Source and Destination Port match Prevent UDP Blat Attack – UDP Source and Destination Port match
Prevent Ping Of Death Attack – Prevents receiving ping packets with a size larger than 512 bytes through the use of fragments, which can target vulnerable systems.
Prevent Invalid TCP Flags Attack – Prevents receiving packets with invalid TCP flags. TCP Flag SYN set and Source Port less than 1024 or TCP Control Flags = 0 and TCP Sequence Number = 0 or TCP Flags FIN, URG, and PSH set and TCP Sequence Number = 0 or TCP Flags SYN and FIN set.
Prevent TCP Fragment Attack – Drop IP Packets that have a TCP header less than 20 bytes.
Check First Fragment Only – Enable checking DOS attacks on IP first fragments
Prevent Smurf Attack – ICMP Echo packets (ping) to a broadcast IP address are dropped.
Prevent Ping Flood Attack – Prevents Ping Flood by limiting the number of ICMP Ping packets. The rate is 1000 ICMP packets per second.
Prevent Syn Flood Attack – A SYN flood attack sends TCP connections requests faster than a machine can process them. Setting this filter limits the rate of TCP connection requests.